Friday, September 25, 2009

Halloween Table Runner

I love Halloween! There is no denying that! I would transform my home into a haunted house and charge admission if I could! But, since that is out of the question, I settled for this hauntingly perfect way to at least deck out the table!


********


Materials you will need:
-sewing machine 
-fabric glue
-black fabric (enough to cover desired area of table)
-pom pom fringe
-rick rac 
-silver paint pen


Start by measuring and cutting out fabric to desired size to fit your table. Hem edges of fabric. You can also leave them raw if you want an unfinished and frayed look.


Next, you will want to place a piece of tinfoil under your fabric to prevent the paint from bleeding through onto your work surface. Begin to draw spiderwebs all over your fabric. Different shapes and sizes add a lot of character! Never drawn a spider web before? Use a ruler to help make straight lines and also go here to get some ideas!


You should have something that looks like this when the drawings are done:


Next, you will want to measure your pom pom fringe to the width of the fabric. Start to glue the rick rack on. If you are super ambitious, you can sew it on, too! Be sure to fold the ends to the back of the fabric. Glue should take about 15-30 minutes to dry.


Finally, glue (or sew!) the rick rack on top of the upper portion of the pom pom fringe. Again, fold ends to the back of fabric. Let dry.....
and give yourself a pat on the back because you are now done! 

Decorate with your favorite Halloween items and some pumpkins of different sizes and colors, and you are ready!

fabric: $1.50/yard ( I needed 2 yards)
fabric glue: $5.99 
paint pen: $2.65
pom pom fringe: $3.50/yard (I needed 1 yard)
rick rack: $1.35 pack (4 yards in 1 pack)
__________________________________
Total Cost: $14.99
Total time to complete project: 2.5 hours


Tuesday, September 22, 2009

Fabric Covered Bangles


Are you wondering what to do with your small scrap pieces of fabric? Are you like me and buy fat quarters with no purpose or use in mind, but only because they are pretty? Well here is a great way to use some of it up and accessorize your wardrobe as well! 

What you'll need:
-Fabric or craft glue
-scraps of fabric
-bangles (simple, preferably clean edges with no detail)


Did you ever own a few of these back in the 80's? I found them in my parent's playroom for the grandchildren. The granddaughter's used them to play dress up and I hadn't seen them in years! You can find them at most thrift stores and tag sales, however. You can also use metal or wood bangles if you have any laying around.


Start by cutting narrow width strips of fabric. I found that 1/4" wide worked best. The average bangle will use about 1 yard in length. You can make several shorter strips if your fabric is not long enough. Don't worry about getting your cuts even, you will not be able to tell when it is all done.


Put a dot of glue on the front and back of the bangle to hold starter piece of fabric in place. Wind the fabric around the bangle starting from the backside first. Slightly overlap the fabric as you go. Place another dot of glue every few winds to keep fabric from sliding during wear and tear. If you come to the end of the fabric and need to start a new piece, simply start on the back again by gluing the new piece in place and pick up where you left off.


So simple and so quick! You are done! You can even tie them together with cute ribbon and they can be worn as a set or worn separately! 


Saturday, September 19, 2009

Embellishing Project #2


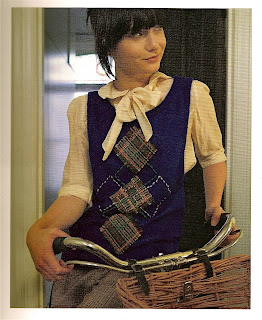
I have been working on my second project from Kayte Terry's book Embellishing - Techniques and Projects and have been having a lot of fun with it! This woman is amazing and I love so many things in her book! I really like that a lot of the projects are quite simple and really inexpensive. I am looking forward to a day with cooler weather just so I can sport my new sweater vest!

*****

Here is the photo from the book used as inspiration:


Here is what I came up with:
(sorry, no cute bike to prop with!) 
Cut out squares of plaid fabric and use Heat and Bond to attach to sweater. Simply hand stitch around the border of each square and then hand stitch more diamonds to create the argyle look.

The hand stitching was the most time consuming part of this project. The needle had a difficult time getting through the thick weave of the wool. 


The book shows the edges of their fabric frayed, but I stitched around each square with my sewing machine so that they wouldn't fray too much. 
Don't worry about getting your stitches looking exact. It's nice to have it a little imperfect, otherwise it would look factory made and that would defeat the whole purpose! Handmade items always have character! 


I also added this nice little detail!


FYI: wool suiting material can be very expensive but you only need about 1/8 of a yard (if that) and discounted remnants can usually be found in the clearance section of the fabric store.

sweater from thrift store: $3.50
wool plaid fabric: $2.50 
Embroidery thread: 2 qty. at .35 cents/ea.
heat and bond: $1.59
_________________
Total cost: $8.29
Total time: 3 hours


***To view another great embellishing project from Kayte Terry's book, click here!***


Friday, September 11, 2009

Upcoming Events!


For the Utah locals, you may want to check this out!:

Garden of Art...A Bohemian Girl's Rhapsody!
Sept. 18 - 19
I am excited to attend this show! It will be a first for me and I am even hoping to get a little Christmas shopping done here!

for more information and a sneek peek at the vendor list and their creations, visit the show's blog:


***********

Also, it is hard to believe, but winter craft fairs around the valley are already in progress! Applications are already being accepted for the Winter Beehive Bazzaar! If you think you have what it takes, click here for an application! The deadline is only a week away so hurry and get yours submitted!

You can visit the blog website for further information on participating vendors, dates and upcoming events!


***********

Also, Bijou Market was a huge success this spring and they are kicking off a winter market as well! We are all excited for this event to happen again in November! If you are interested in applying for this great show click here


(Do you all love winter craft shows as much as I do? I am really excited for the holiday festivities to start!)