Friday, October 30, 2009

Plugs


There is a great art and craft market coming up that I am excited to tell you about! The Bijou Market is going on next Saturday in Provo, UT. This town really has something to shout about with all it's local talent and innovation! A lot of new things are becoming of this once small town and I am so happy to see a lot of great local businesses moving in and a hunger for all that is handmade! Please check out this great event and support all the amazing artists and vendors that live among us!


**********

In speaking of the great local business and talent, I want to give my big sister a nice, warm plug here on H is for Handmade! Colett Yarro, will be one of the many vendors at the Bijou Market next weekend! She has quickly become a local favorite after appearing in many craft shows over the past several years. Her work has been showcased at the new restaurant Communal, located in Provo, and in both locations of the trendy Paisley and Pomegranate stores. She has also been a vendor of the Oh Sweet Sadie boutique, Art Market and of course the ever so popular Beehive Bazaar! Colett also received a nice shout out from popular blogs such as Design Mom, Your Heart Out and Sweet Life in the Valley. I want to wish her the best of luck in her upcoming shows and if you happen to see one of her paintings and want it, you better buy it before someone else does! 

 Here is just a small sample of what she does:


Friday, October 23, 2009

Silhouette Luminaries

I have been a little smitten by the silhouette craze that is occurring all around us these days! I wanted to bring something into my home that didn't include my child's profile or require us to sit still in the light and trace out our shadowy figures on the wall! Here is a really simple way to add the trend into your home and with a lot less work and not having to wrestle with family members sitting still! 


***********************


Materials you will need:
-glass cylinder vase
-velum paper
-velum tape
-ribbon (if you choose)
-word processing or design program on computer
-scissors or paper trimmer

(hint: cylinder vases can be found at most thrift stores. Also try looking in the stemware section for cylinder drinking glasses. Velum can be found at either a scrapbook store or a paper supply store but a lightweight copy paper may work, too. Card stock and scrapbook paper is too heavy.)


First, you will want to measure your vase to see if the image should be printed on the paper vertically or horizontally. Write down the measurements for when you need to trim your paper


Find a silhouette image (copyright free!) online and drag into any design or word processing program you have. I went here and here to find images. Here you will need to find out where your image should be placed on your paper. Will you need to center it, lower it, enlarge it......?


I found that I had to do quite a few adjustments and print the image at a larger size than I expected. Always check the "print preview" option beforehand so you can see on screen what it will look like when printed on your paper.


Run a few samples from your printer on regular paper and hold up to your vase to make sure you have made the right adjustments to your image


(hint: Wash your hands! Any oil or residue will show on velum so make sure you have clean fingers before handling your paper!)


When you have perfected your layout and make your final print to velum (or paper) take your measurements and trim paper to size of vase. Rule of thumb: Measure twice and cut once! 


Now you will want to apply your velum tape (or double stick tape for regular copy paper) in a vertical line down the outside of your vase. I actually had to apply two lines. Velum tape will not show through where regular double stick tape does. 


Adhere one side of your velum to the tape and begin to roll the paper around the vase and attach other side down. Run your finger along to seam firmly to make sure the paper is attached securely. 


*For added detail, you can add ribbon around the top of your vase if you choose.*


Finally, you can drop a votive in the bottom of your vase and light up the evening! I think these would be really cute using images for the upcoming season as well! Maybe these will be my neighbor gifts this year?


Glass Vases: .50 cents - $1.00 from thrift store
Velum: .35 cents/ea.
Velum tape: $6.00 (I used a 40% coupon to Micheal's crafts)
____________________
My Total Cost: $6.15

Friday, October 9, 2009

Heather Bailey's Fabric Flower

A local program in Utah, Studio 5, was ever so fortunate to have Heather Bailey grace their set this week! She did a great tutorial on how to make fabric flowers that I think would be a great asset to any shirt, headband, purse, belt or pillow! I have always loved her fabrics but I can only imagine the possibilities with fabrics that have more muted-organic tones to it as well. So pretty!

(If you want to skip the interview and go straight to the tutorial, fast forward to 6:30 on the time bar)

Monday, October 5, 2009

Mark Your Calendars!


There is a must see event happening in Sugarhouse this weekend and I encourage all locals to attend! Art Market is an art and craft show that occurs 4 times a year featuring local vendors from all around the state. I just can't believe the fall show is already upon us! For a closer look at participating artists click here and check it out for yourself! 

Did you see your favorite local artist on the list?!


I did!
check out Kanani Hayes this weekend! She spins more vinyl than anyone I know....on her sewing machine, that is! I love that her concept is unique and modern! She can be spotted at Frosty Darling downtown SLC, etsy and you may have even stopped at her very busy booth at Swiss Days in Midway, UT. Pick up one of her creations either for yourself or for someone you love this holiday season! 

(I know from experience that the vinyl baby bibs are durable and wash well! I love mine!)

Just go ahead and get one of everything, I know you want to!

Thursday, October 1, 2009

Spooky Candlestick Transformation


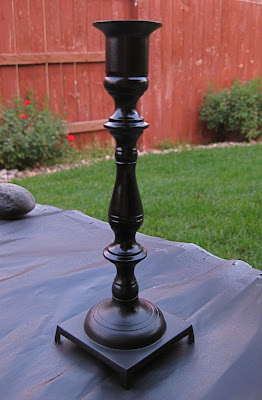
I have seen black candlesticks for sale for the upcoming holiday in the stores but didn't want to spend the money on something I knew I was only going to have up in my house for a month. Here's an inexpensive DIY for black candlesticks that are sure to add just the right amount of spookiness to your home this Halloween!


I went to my local thrift store and bought several brass candlesticks - each at a different height and shape.
(hint: if there is any wax on your metal candlesticks, heat your oven to 250 degrees. Cover a cookie sheet with tinfoil and place candles on cookie sheet. Heat candlesticks in oven for 10-15 minutes until wax bleeds onto foil or can be absorbed and wiped off with a paper towel. Remember to use hot pads when handling hot cookie sheet and candlesticks!)


Place candlesticks on steady and covered surface with enough room between them to maneuver the can of spray paint. 


Give them a couple coats of black paint and allow to dry.


Next, display with your favorite Halloween decorations and say BOO! 


candlesticks: .50 cents - $1.75/ea. (I paid a total of $7.00 for qty. 7)
black spray paint: $2.75
candles: 7 qty. @ .99 cents 
_____________________
Total: $16.68
Total time: 30 minutes

(FYI: You can find the skull and torn netting at the dollar store and taper candles at Michael's Crafts!)