Monday, December 28, 2009

Marshmallow Madness


Photo: Country Living Magazine

Now that the eye of the holiday storm has moved past us, the days seem long and a bit empty. Especially with the frigid temperatures that are keeping us from setting foot outside! The kiddo loves all his new toys and is perfectly happy watching his videos and staying in his room discovering, pretending and being amazed that Santa brought him exactly what he asked for. As for me, I am a little glad that I can get back to creating and filling the holiday void with some homemade tasty treats!
Did you know that you can make your own marshmallows? I always thought these had to be made by some big fancy machines - in some factory far far away in a town that no one has heard of - with ingredients that the FDA approved of by only a narrow margin? How else could they be so good?! I recently found this recipe on the Food Network site and the 100+ ratings were mostly 5 stars! Now, where did I put my hot cocoa?


Ingredients

  • 3 packages unflavored gelatin
  • 1 cup ice cold water, divided
  • 12 ounces granulated sugar, approximately 1 1/2 cups
  • 1 cup light corn syrup
  • 1/4 teaspoon kosher salt
  • 1 teaspoon vanilla extract
  • 1/4 cup confectioners' sugar
  • 1/4 cup cornstarch
  • Nonstick spray
Directions
Place the gelatin into the bowl of a stand mixer along with 1/2 cup of the water. Have the whisk attachment standing by.
In a small saucepan combine the remaining 1/2 cup water, granulated sugar, corn syrup and salt. Place over medium high heat, cover and allow to cook for 3 to 4 minutes. Uncover, clip a candy thermometer onto the side of the pan and continue to cook until the mixture reaches 240 degrees F, approximately 7 to 8 minutes. Once the mixture reaches this temperature, immediately remove from the heat.
Turn the mixer on low speed and, while running, slowly pour the sugar syrup down the side of the bowl into the gelatin mixture. Once you have added all of the syrup, increase the speed to high. Continue to whip until the mixture becomes very thick and is lukewarm, approximately 12 to 15 minutes. Add the vanilla during the last minute of whipping. While the mixture is whipping prepare the pans as follows.
For regular marshmallows:
Combine the confectioners' sugar and cornstarch in a small bowl. Lightly spray a 13 by 9-inch metal baking pan with nonstick cooking spray. Add the sugar and cornstarch mixture and move around to completely coat the bottom and sides of the pan. Return the remaining mixture to the bowl for later use.
When ready, pour the mixture into the prepared pan, using a lightly oiled spatula for spreading evenly into the pan. Dust the top with enough of the remaining sugar and cornstarch mixture to lightly cover. Reserve the rest for later. Allow the marshmallows to sit uncovered for at least 4 hours and up to overnight.
Turn the marshmallows out onto a cutting board and cut into 1-inch squares using a pizza wheel dusted with the confectioners' sugar mixture. Once cut, lightly dust all sides of each marshmallow with the remaining mixture, using additional if necessary. Store in an airtight container for up to 3 weeks.
For miniature marshmallows:
Combine the confectioners' sugar and cornstarch in a small bowl. Line 4 half sheet pans with parchment paper, spray the paper with nonstick cooking spray and dust with the confectioners' sugar mixture.
Scoop the mixture into a piping bag fitted with a 1/2-inch round piping tip. Pipe the mixture onto the prepared sheet pans lengthwise, leaving about 1-inch between each strip. Sprinkle the tops with enough of the remaining cornstarch and sugar mixture to lightly cover. Let the strips set for 4 hours or up to overnight.
Cut into 1/2 inch pieces using a pizza wheel or scissors dusted with the confectioners' sugar mixture. Once cut, lightly dust all sides of each marshmallow with the remaining sugar mixture and store in an airtight container for up to a week.


Friday, December 11, 2009

Doll Up Your Kicks!

I just can't resist any kind of embellishments these days! If there is a garment donning a ruffle, lace, bow or frill of any kind, you can bet that you will see me standing there, holding it, loving it, all with just a small amount of drool dripping from my lips!
Shoes are no exception! However, when designers and shoe companies add flair they also add a heavy price tag to go with it. Here is a great way to garb up your plain shoes with very little effort and very little cash...if any at all! If you have any left over scraps laying around the house, this project is for you!


Materials you will need:
-any kind of lace, trim, or ribbon
-needle and thread
-bobby pin (preferably a higher quality, sturdy pin that will hold it's form)
-broach, old earring or button


Measure the toe of your shoe to see just how long and wide you want your lace or trim to be. Fold it in half and tie a piece of thread around the middle...


You should have something like this when done with this first step.


Next, sew on your first piece of trim with a basic stitch, attaching it to the top of your lace where you have just gathered it.
hint: slightly folding the end of your trim over your lace will provide a more finished look.


After you have attached your trim, move on to your next piece of trim, placing it how you would like it. You can do ruffles, folds, or just leave them flat as I have done! The great thing about this project is that you can customize it to fit your personal style and color preference!


After all your trims or ribbons have been sewn on, you can now attach a cabochon of your choice! I chose some vintage earrings that had lost their backs. A little bling never hurts anything!


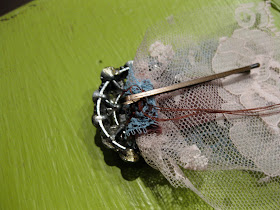
Now you can sew your embellishment onto your bobby pin. Make tight, close stitches so that it doesn't slip off the pin.


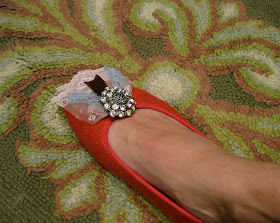
The last step is to slide your pin onto the toe of any of your shoes that are feeling a little "left out". Bring them back into step at your next party or holiday gathering with a little pizazz and panache!

You are now the bell of the ball!

Since I used materials I already had on hand, this project didn't cost me anything. I figure if you were to go and buy trims, bobby pins and a broach of some kind, this project will set you back about $10.00 is all!

Total time to complete project: 20 min.

Check out these great embellished shoes for some inspiration:
J. Crew Ballet Flat
Anthropologie Sewing Notions Flats
Pour la Victoire Janise Flat
Oscar de la Renta Embroidered Flats
Rafe'e Emmy Embellished Flat

Wednesday, December 2, 2009

Beehive Bazaar Bliss!

The time has come once again for the most fantastic artists and crafters along the Wasatch Front to come together and showcase their amazing handmade talents! The Beehive Bazaar begins Thursday evening and will run through Saturday evening. This is a must hit event and a VERY good place to do some Christmas shopping! For a lineup of vendors and a sneak peek at the magic they create, just click here and feast your eyes on some delicious eye candy creations!

P.S. If you stop by on Thursday p.m. for the big opening party, I will be working the check out table so please stop and say hello! I would love to see all you pretties there!


Saturday, November 28, 2009

Wrap it up!

Let's face it - gift wrapping can be a chore. "Can" being the key word in that sentence! I have been guilty of just slapping on the wrapping paper bought in bulk at Costco with a simple metallic sticky bow and calling it good. This year I am vowing to make my Christmas wrapping a craft! Giving a handmade gift is beautiful in itself, but how about giving it to them with a little handmade wrapping flair as well? The recipient may be hesitant to open such a lovely work of art, so just assure them that what's inside is just as nice!

*

Check out all these pretties for some inspiration in your holiday wrapping extravaganzas!
Photo: Better Homes and Gardens


Photo: Apartment Therapy


And what holiday post about gift wrapping can be complete without mentioning the queen of handmade: Martha Stewart!I love the next three photos!


For more creative and handmade gift wrap ideas, be sure to check out these sites:
Happy wrapping to all, and to all a good night!

Heather Bullard - part one, part two, part three

Sunday, November 15, 2009

Felt Chrysanthemum Pillow

Felt has become one of my new best crafting friends...next to Mod Podge, that is! I love the endless possibilities of it and even better yet: No fraying! Here is a simple and elegant way to dress up your bed, sofa or favorite chair for very little money but with big impact! This craft takes a little more time to do, but it is worth a little extra work! Flowers say it best!


Materials you will need:
-plain fabric covered pillow form (any size will do)
-felt (3/4 yard)
-copy paper
-fabric glue
-several straight pins


Start by making 4 petal patterns. My pillow is 18"x18" so I made the largest petal pattern measuring approx. 6"x 3" but you can adjust it to your liking. Make each following pattern slightly smaller than the last.


Next, cut out felt petals using your patterns. For my pillow size I needed 20 of the largest petal, then 14 of the next size down, 8 of the next size and 4 of the smallest.


After all petals have been cut you are now ready to glue them to your pillow! Apply a small amount of fabric glue to the bottom corners of your petal......


then fold the corners in and hold for a few seconds while the glue starts to bond and take hold. Fabric glue can be very messy, making "webs" and leaving you with sticky fingers as you go. Be careful and wipe off hands and glue tip often!


Turn petal over and apply another liberal amount to the back bottom half of the petal.


Begin to lay them out in a circular form and use a pin to hold until glue dries.
HINT: I started with a petal in the 12 o'clock position, another in the 3 o'clock position, one in the 6 and another in the 9 o'clock position. Then I begin filling in the spaces between them to assure a more symmetrical look.


Once you are finished with the first layer, you can move onto the next size petal placing them over the first row. Place them slightly lower and between the large petals. Pin to hold.


Once you have finished all layers, you may have an empty space in the middle where all the smaller petals come together at the base. I cut out a "X" shaped petal and glued it in the center.


Center is covered and looking good! Finally!
HINT: If you are using black felt and have any glue dabs showing against the dark surface, color over them using a black Sharpie or permanent marker!


You are done! How does it look!? Now place your pillow on your favorite spot to relax and kick your feet up after all your hard work!


Pillow: $7
felt: $3
glue: $3.60 with coupon
_____________________
Total cost: $13.60
Total time to complete project: 2 hrs.


Friday, October 30, 2009

Plugs


There is a great art and craft market coming up that I am excited to tell you about! The Bijou Market is going on next Saturday in Provo, UT. This town really has something to shout about with all it's local talent and innovation! A lot of new things are becoming of this once small town and I am so happy to see a lot of great local businesses moving in and a hunger for all that is handmade! Please check out this great event and support all the amazing artists and vendors that live among us!


**********

In speaking of the great local business and talent, I want to give my big sister a nice, warm plug here on H is for Handmade! Colett Yarro, will be one of the many vendors at the Bijou Market next weekend! She has quickly become a local favorite after appearing in many craft shows over the past several years. Her work has been showcased at the new restaurant Communal, located in Provo, and in both locations of the trendy Paisley and Pomegranate stores. She has also been a vendor of the Oh Sweet Sadie boutique, Art Market and of course the ever so popular Beehive Bazaar! Colett also received a nice shout out from popular blogs such as Design Mom, Your Heart Out and Sweet Life in the Valley. I want to wish her the best of luck in her upcoming shows and if you happen to see one of her paintings and want it, you better buy it before someone else does! 

 Here is just a small sample of what she does:


Friday, October 23, 2009

Silhouette Luminaries

I have been a little smitten by the silhouette craze that is occurring all around us these days! I wanted to bring something into my home that didn't include my child's profile or require us to sit still in the light and trace out our shadowy figures on the wall! Here is a really simple way to add the trend into your home and with a lot less work and not having to wrestle with family members sitting still! 


***********************


Materials you will need:
-glass cylinder vase
-velum paper
-velum tape
-ribbon (if you choose)
-word processing or design program on computer
-scissors or paper trimmer

(hint: cylinder vases can be found at most thrift stores. Also try looking in the stemware section for cylinder drinking glasses. Velum can be found at either a scrapbook store or a paper supply store but a lightweight copy paper may work, too. Card stock and scrapbook paper is too heavy.)


First, you will want to measure your vase to see if the image should be printed on the paper vertically or horizontally. Write down the measurements for when you need to trim your paper


Find a silhouette image (copyright free!) online and drag into any design or word processing program you have. I went here and here to find images. Here you will need to find out where your image should be placed on your paper. Will you need to center it, lower it, enlarge it......?


I found that I had to do quite a few adjustments and print the image at a larger size than I expected. Always check the "print preview" option beforehand so you can see on screen what it will look like when printed on your paper.


Run a few samples from your printer on regular paper and hold up to your vase to make sure you have made the right adjustments to your image


(hint: Wash your hands! Any oil or residue will show on velum so make sure you have clean fingers before handling your paper!)


When you have perfected your layout and make your final print to velum (or paper) take your measurements and trim paper to size of vase. Rule of thumb: Measure twice and cut once! 


Now you will want to apply your velum tape (or double stick tape for regular copy paper) in a vertical line down the outside of your vase. I actually had to apply two lines. Velum tape will not show through where regular double stick tape does. 


Adhere one side of your velum to the tape and begin to roll the paper around the vase and attach other side down. Run your finger along to seam firmly to make sure the paper is attached securely. 


*For added detail, you can add ribbon around the top of your vase if you choose.*


Finally, you can drop a votive in the bottom of your vase and light up the evening! I think these would be really cute using images for the upcoming season as well! Maybe these will be my neighbor gifts this year?


Glass Vases: .50 cents - $1.00 from thrift store
Velum: .35 cents/ea.
Velum tape: $6.00 (I used a 40% coupon to Micheal's crafts)
____________________
My Total Cost: $6.15

Friday, October 9, 2009

Heather Bailey's Fabric Flower

A local program in Utah, Studio 5, was ever so fortunate to have Heather Bailey grace their set this week! She did a great tutorial on how to make fabric flowers that I think would be a great asset to any shirt, headband, purse, belt or pillow! I have always loved her fabrics but I can only imagine the possibilities with fabrics that have more muted-organic tones to it as well. So pretty!

(If you want to skip the interview and go straight to the tutorial, fast forward to 6:30 on the time bar)

Monday, October 5, 2009

Mark Your Calendars!


There is a must see event happening in Sugarhouse this weekend and I encourage all locals to attend! Art Market is an art and craft show that occurs 4 times a year featuring local vendors from all around the state. I just can't believe the fall show is already upon us! For a closer look at participating artists click here and check it out for yourself! 

Did you see your favorite local artist on the list?!


I did!
check out Kanani Hayes this weekend! She spins more vinyl than anyone I know....on her sewing machine, that is! I love that her concept is unique and modern! She can be spotted at Frosty Darling downtown SLC, etsy and you may have even stopped at her very busy booth at Swiss Days in Midway, UT. Pick up one of her creations either for yourself or for someone you love this holiday season! 

(I know from experience that the vinyl baby bibs are durable and wash well! I love mine!)

Just go ahead and get one of everything, I know you want to!