Tuesday, March 30, 2010

Easy DIY Picture Frames

H is for Handmade is having it's very first guest blogger today! I am so happy to introduce my friend Lyndsey to you all! I am glad that she was able to take a little time away from her day job with American Craft's and lend a hand in a tutorial! Let's give a round of applause to this talented and gracious woman!


Lyndsey Wells is the paper fiend behind the stationery place, showcasing a daily dose of beautiful stationery, DIY paper crafts and inspirational designers — but in real life, her day job is working in marketing for a scrapbook company and supporting her grad-student husband. she loves dessert, all things social media [follow her on twitter here] and curling up with a good book or movie.


****************************************************************


hello, h is for handmade readers! i'm lyndsey, and i'm here to share a fun and easy picture frame project with you. amy's craft room is currently undergoing a bit of a makeover, so she invited me to share one of my own crafty ideas in the meantime -- and i was more than happy to help! i LOVE the inexpensive and creative ideas shared on this blog, and hopefully mine will partially measure up to all the cute goodness going on around here.

i write a blog called the stationery place, where i post about all things related to beautiful paper products. so, i knew i wanted to share a paper-friendly project with you. i'm currently pregnant with my first baby, a boy, and i'm always on the lookout for fun ways to decorate his future nursery. so, with all this in mind, i give you my project:

the paper dino frame

first, gather up your supplies.


here's what you'll need:
- any size of wooden frame [i bought mine at michael's...they have multiple sizes of raw wood frames for $0.99]
- decorative paper
- mod podge craft glue + foam brush for application
- ribbon or other preferred embellishments
- the typical craft supplies...scissors or a paper cutter, a pencil for tracing, etc.

arrange the frame on top of the patterned paper in the place you want it, and trace the shape of your frame on the backside of the paper. you'll also need to pop out the center card to be able to cut out the inside of your frame.


when you're done, you should have a paper frame to match your wooden frame, like this:


now's the fun sticky part! get your mod podge ready. i like to start by painting a nice thick layer of mod podge on the bottom side of the paper -- the side that will stick to the frame. place the paper onto the frame and apply pressure so it sticks. then, get crazy with your glue! i paint all the edges and even on top of the paper, just to make sure everything sticks. once the mod podge dries, it also gives your frame a nice shiny look for an added touch.


by applying pressure as you mod podge, you can squeeze out any air bubbles that might pop up.when you're done with this step, feel free to place some heavy books on top of the frame to press the paper down while it dries. just make sure you put some wax paper over the frame so it doesn't stick!

when your frame is dry, feel free to embellish however you'd like. i put a piece of colored paper inside my frame as a place holder until i have a picture of my baby to stick inside -- and i tied a piece of ribbon along the bottom for a little extra flair. there are tons of possibilities for additional decorations; i just wanted to keep this frame simple for my little man. if i were having a girl, i'm sure i'd go nuts with crochet flowers or beads or something ;)


these michael's frames come with small dowels to stick in the back to help them stand up. here's what the back of my finished frame looks like:


there you have it! my finished paper frame. this project took less than an hour to complete [not counting dry time] -- easy and fun, with so many different creative possibilities! feel free to try your hand at different embellishments or paper; you could even mod podge a bunch of different coordinating papers all together. i like projects like these because you can modify it in a million different ways -- whatever suits your taste!

hope you liked my little project! thanks for reading...and thanks to amy for inviting me to say hello!

Wednesday, March 24, 2010

Happy Easter Banner Tutorial

Here is an easy Easter craft that I did last year and had it posted it on my family blog. How nice that I was just able to copy and paste it into this one!

It's pretty simple and maybe even a bit self explanatory, but for the people who just don't get the whole "crafty" thing, I broke it down into a few simple steps! It took no more than 30 minutes to make and it was a lot of fun! I also think using patterned paper would be cool. I might just have to make one of these for each holiday!


Materials that you will need:
- 11 sheets of 8.5X11 card stock (colors of your choice)
- 3 yards of ribbon or string
- Computer
- Paper trimmer or scissors
- Hole punch


Pick a font on your computer to your liking and enlarge it considerably.
       You may need to run a few tests on plain paper to see if you have the correct sizing. Play              with colors! I chose a dark gray instead of flat black. It seemed a little less heavy with the brighter colors I chose for my paper.
       (I had to enlarge mine 2,000% for the right size!)


If you are using multiple colors of paper, make a key as reference. As you can see, the words spell out "happy easter" from left to right. To make it easier, I printed 1 letter at a time while avoiding paper jams from the use of heavy card stock. After printing off one letter, I would simply delete it on the screen and type in the next letter according to the key. Feed printer coordinating paper as each letter is typed.


* Each letter will take up one sheet of paper *


Measure out how large you want your squares to be, making sure your letters are centered. I just measured how far the letter automatically printed from the top and left side then matched it on the bottom and right side. If you want to get real creative, you can use pinking shears or patterned blade scrapbooking scissors instead of a straight edge.


Make a template of where you would like your holes to be for weaving your ribbon or string through. Be sure that these are centered as well! If you want to add any embellishments, this would be the time (i.e. spray glitter!).


Finally, weave your ribbon through each hole!


Happy Easter everyone!

Friday, March 19, 2010

Children's Art Tote Tutorial

Here's a nice little project to keep you busy this weekend! I don't know about the weather where you live, but I am looking out my window as I type and it is snowing, snowing and snowing some more. Ugh. 
Anyway....


What kid is not going to devour the goodness of this? 
F.Y.I. it makes a good church or preschool bag! Just insert a quiet book or flash cards and your kiddo is set!


Materials that you will need:
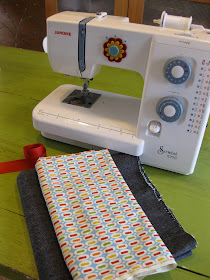
-sewing machine
-3/8 yrd. fabric (heavy and sturdy fabric is best!)
-fabric measuring approx. 14"X14" (a quilter's fat quarter is perfect!)
-ribbon (optional)
-scissors
-iron


Begin by cutting your main fabric to measure 41 3/4" x 13 1/2"
This will allow for a 1/2" seam allowance
HINT: When choosing fabric for this project, make sure you chose one that has a pattern that can work both horizontally and vertically unless you are using fabric from a 60" bolt or larger. 


Next you will want to cut out your small pockets. Cut 2 pieces measuring 13 1/2" X 6".


Now you will want to make a 1/2" hem on your main fabric's two sides that measure 13 1/2". 
HINT: A good seamstress always uses her iron to press down the hems before sewing. This will help hold your measurement and make it easier for you to sew.


Then, take the fabric for your small pockets and position them on the top of your tote fabric. Pin them down to hold in place.


Stitch along only the bottom edge. 
Be careful to not sew your large pocket closed. Only sew the bottom of the small pocket to the bottom edge of your tote fabric.


You should have something that looks like this when you are done.


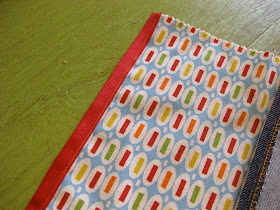
Now, if you are wanting to add ribbon for an added detail, this is the time to do it. I folded over a piece of grosgrain ribbon, ironed it down, placed the fabric inside it and stitched along the top of the pocket. Not necessary, but nice! If you are not using ribbon, simply sew a small hem on the top of your pocket for a finished look. Iron.


It's now time to sew the dividers into your pockets. Measure and mark out how much space you think you need to hold the various art supplies. I made mine in all different sizes. Keep in mind that you need to allow room on the sides for a hem.


You should have something that looks like this.


After all your dividers have been sewn in, it's now time to fold the bag in and stitch it together to make the 2 large pockets. Fold right sides together so that each pocket measures 10". Sew only along the 10" sides. It should somewhat resemble a pillow sham that opens in the back.


By sewing 10" pockets, it will generate a much needed gap in the middle of your tote. This will allow the bag to fold up with the bulk of art supplies in it- much like a binding on a book.


After you are done sewing the sides together, turn your bag right side in. Be sure to poke out all your corners! Iron your bag open and press all the edges. Your almost done! You will have a small lip of fabric in the middle. Use fabric glue, hem tape, or a small stitch to fasten it down.


Make handles by cutting two pieces of fabric measuring 
12"x3" and sew right sides together. Next, turn your handles right sides in and fold raw ends under and press with an iron.


Measure 3" from each side and sew your handles onto your bag. I had to hand stitch mine because my machine was not strong enough to sew through 6 layers of denim. Go figure!
You're Done!

Now you can decorate the front of it to your (or your child's) liking! Feel free to copy mine. I simply cut out triangles of different fabrics to make a bunting banner and used heat-n-bond to adhere it to the bag or you can also use fabric glue. I used fabric glue to then stick the ribbon on. Easy, easy, easy!


How did you do? Were my instructions clear enough for you? I understand that this bag is a little more involved than previous tutorials. If you have any questions, please email me at the address listed at the top left of the page. 
Have a great weekend!

Monday, March 15, 2010

Chocolate Cookies, Oh My!

        
We went to my parents house for dinner last night, as usual. After the meal we sat around and talked about what dessert we could make that would be worthy to follow my father's homemade beef stroganoff. Dad said he wanted homemade brownies. Should he get what he wants for making such a tasty meal? Mom said she wanted cookies. Should she get what she wants for cleaning up the mess left from making such a tasty meal? I said let's have both! Here is what we made - a mighty fine combination to please all that worked so hard that evening!
                                                                                              
After reading the recipe card, my mom said that she had some white chocolate but that it was just in a little different form than "chips". Yeah, no kidding!
.
.
.
.
.
.
.
A friend had given her some white chocolate and a nativity candy mold for Christmas this past year. After my mom made it, she felt guilty about eating it so she put it in an air tight container and sealed it up. I guess there is something a little disturbing about biting into baby Jesus and saying, "Mmmmm! It's soooo good!"


I'm not afraid. I broke the heads off of the Wise Men, the shepherd, and Jospeh and broke up all their bodies and threw them in the dough. Sorry fellows but you have a greater purpose now!


Completely unrecognizable and delicious! The men of ancient times saved the day and made our cookies the best they could be! 

Tuesday, March 2, 2010

What's Your Type?


There is something brilliant that I am going to share with you! My sister sent me a link to an interactive video done by Pentagram that determines "what kind of font type are you?" It is amazing and surprisingly dead on...well it was for me, at least. I hope you enjoy it as much as I did and I think the brains behind this needs some sort of big, fat, shiny medal! 


I am Pistilli Roman. I heart this font! It is a classic with clean lines but still has an edge to it. Perfect fit! I found more info on the font from the Walker Art Center. Very interesting indeed!


So....What type are you