Tuesday, June 29, 2010

Puppet Theatre Tutorial

I checked out Hancock Fabric's big sale the other day. Very dangerous! Everything is marked so low that it was hard to control myself! There are a lot of really great fabrics on clearance right now! If you want to check it out, I was told that the sale will be going on until July 7th. This fabric in particular caught my eye:
                                 
(P.S. it feels more like a canvas instead of polyester)


So what does one do with 2 yards of red and white stripe, outdoor fabric? 
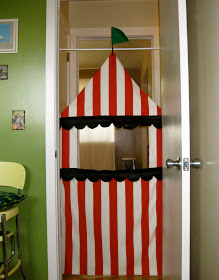
I use a portion of it to make a puppet theatre, of course!
I think this puppet theatre would be cute in any fabric, really. I am just a little enamored with stripes and anything circus themed right now so, naturally, I opted for that route. I thought about doing a more detailed tutorial, but I found that it was mainly just taking a few measurements and simply hemming all the sides. It was so simple that I just thought I would make a key for you to go off:

*
These measurements are for a standard 32" doorway. If your doorway measures differently, you will need to adjust the width of the fabric (see letter A) which will also result in a different length of your peak (see letter c).
(sorry, I have not yet invested in photoshop, so this is blog drawing is very elementary!)
A = This measurement is your doorway's width - remember to add an inch for a seam allowance
B = 46"
C = Find the center of your fabric and measure up from where your window is - or will be, then fold sides in all the way down to almost the top of the window to make a peak. See photo below.
D = 20" 
E = 12" 
F = 20" - This too may vary with the doors width


A total of 3 tension curtain rods will be used to hold your theatre in the doorway. After you have cut out your fabric and hemmed all the sides, including your window, you will need to add 2 pole pockets on the back. 1 right above the window and the other right below the window.
(I purchased my rods at Walmart for $2.50 ea.)


You will also need to attach a ring large enough for your 3rd tension rod to fit through, on the top of the peak to hang your puppet theater.


Additional details I added:
A pocket to hold a flag which I made from felt and a chopstick


A felt scallop banner to the bottom and top of the window to hide stitching for pole pockets


Thanks for stopping in! If you decide to make one, I would love to see pics of your project! Have fun!


Tuesday, June 15, 2010

Perfect Picnic Tutorials

To me, nothing says "summer" like a perfect picnic! There is just something magical about a mobile meal and dining alfresco! I have gathered up some really great tutorials and ideas to ensure that your next portable dinner outing is equipped with the best handmade accessories! Bon appetit!

Try this eco freindly dish cover tutorial by Allison Hill for your fruit salad!


No picnic is complete without a comfy and durable blanket! Tutorial offered by Craft Stylish.


A great 2-in-1 project! A placesetting tutorail to keep your utencils handy from My Patchwork.


Give your basket a quick makeover with this tutorial by V and Co.


Make these portable cushions from the tutorial by Sew, Mama, Sew to ensure that you have the most comfortable spot at the park!


A tutorial for this handy little condiment caddy can be found at Design Sponge!


If you just want to eat out in the backyard all summer long, how is this little project? Tutorial provided by DIY Diva.


What's a picnic without the great food? Try out a few recipes from DeeDee Stovel's Picnic Book!


Friday, June 11, 2010

Children's Mailbox - Tutorial

Here is the mailbox tutorial I did for U Create. I was asked to wait to post this so that U Create could have exclusivity to it for a month and that it's readers would find it there first. I can't believe that was over a month ago, already! Whaaat? So, now I am presenting it to you...just in case you happened to miss it!

********

My child loves to help us get the mail! He looks forward to the postman coming each day and delivering envelopes filled with what he believes to be invitations to extravagant parties and letters and pictures from Grandma! I don't dare spoil fun by telling him that what he is looking at are merely utility bills and grocery adds! The thought occurred to me that we could have this kind of fun all day long by making him his own little mailbox! Now I love to drop him a little note and picture and watch him pretend the day away and see his imagination run wild!


Materials needed:
1 sheet of poster board
2 sheets of 12X18 stiff felt (a.k.a. Easy Felt)
approx. 1 yard of ribbon (preferably canvas/cotton)
scissors
craft glue or hot glue
patterns printed off computer (provided at the bottom of the post) 


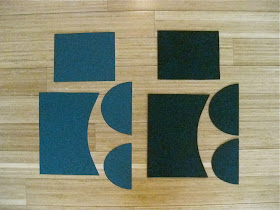
Step 1: After printing the provided patterns, cut 1 set of each piece in both your felt and your poster board. The poster board will provide durability and rigidity to your mailbox. The felt will then be the cover.  


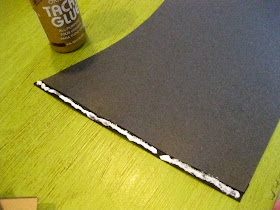
Step 2: Cut a strip of ribbon to the length of the side of your back and front piece. Apply glue to the entire area of the ribbon. 


Step 3:  Glue your 2 pieces of poster board together. Allow glue to dry completely. 
The ribbon will act as a hinge and will allow you to fold and bend your pieces more easily.


Step 4: Now apply ribbon to the opposite end of your paper just as you did in step 3. Allow glue to dry completely. 


This is what you should have when the 4 steps are complete. The ribbons will be on the INSIDE of your mailbox.


Step 5: Apply glue to the entire exposed area to the back of the ribbon. 


Step 5: Fold your front piece over and adhere it to the glue covered ribbon. You will need to hold it down and allow glue to dry completely.


This is what it should look like after all 6 steps are complete.


Step 7: Cut 6 pieces of ribbon measuring 2" in length and glue as shown to the poster board piece labeled "bottom".  These will act as tabs and make it possible to adhere the bottom to the mailbox.


Step 8: Begin to glue the tabs to the inside of your mailbox.


This is what it should look like after the 8 steps are complete.


Step 9: Cut a piece of ribbon the length of the top lid of your mailbox and glue to the lid and the back of your mailbox as shown.


Step 10: Now glue all your felt pieces over the poster board for a more finished look.


Now you can add any embellishments you wish! I simply embroidered on a piece of canvas and glued it to the front. I added a ribbon tab under the lid to make it easier to open and I also used it cover my edges to give it a little detail. You can add a hook or loop of ribbon on the back if you want to hang it on the wall or just leave it as is if you are setting in on a flat surface.


*Templates*
Print out at 100%


Tuesday, June 8, 2010

Matilda Jane


I came across this clothing company that I thought was really cute and should be shared. Matilda Jane offers fashions for the little girlie ones and for mommies too! As far as I know, the clothing is not sold in a store but is sold online and by hosting private trunk shows. When I read the company's bio and how it all started by being just a vendor booth at various art and craft shows, traveling from town to town, I just thought about how so many of us start out making handmade items never knowing when, or if, it could really turn into something more!  I love that her talents and passions are now turning into a profit! Here is an excerpt from her bio:


I really like what she said about how she "can't stop her brain from spinning"! A blessing and a curse that many artists can relate to! I'm beginning to think that it is a requirement! I know there are several nights and early mornings that I wish I could just shut down for even a minute! 

Here are a few pieces from the website that I fell in love with:

For the wee ones
The Lacey Tank


The Tanna Linen Dress


The Frankie Dress


For the Mommas
The Haley Halter Dress


The Cher Dress


The Macey Skirt


The Natalie Skirt


All information on hosting a party and trunk show can be found on their website. Also, be sure to check out the company's blog for updates and additional information!

Wednesday, June 2, 2010

Calling All Crafters!


As I am looking over my calendar for the month of July, I am noticing that there are very few days that I will be around! Which brings me to the need to call on you - my readers, my fellow crafters and my saving grace! I don't want H is for Handmade to be neglected so I am looking for innovative, modern and "out of the box" creations done by YOU! Because after all, in the divine words (kind of!) of Abraham Lincoln, this blog is of the people, by the people and for the people!! 

Just what do I need, you might ask? I would love to have some guest bloggers do any of the following:

- Spotlight your handmade items 
- Provide a tutorial
- Introduce us to either your Etsy shop, blog or website
- Provide great recipes
- Host a giveaway
- Contribute helpful crafting tips or your favorite craft supplies

If you, or anyone you know, would be interested in being featured on H is for Handmade in the month of July, I would love to hear from you! Please contact me at hisforhandmade@yahoo.com. Or, if we are friends or family, I may be bugging you (again!) to help me out!

I know there is some serious talent out there so I hope to hear from you all!